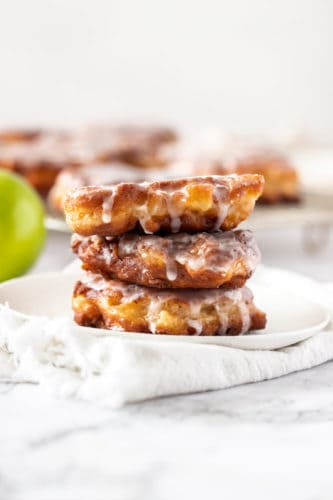
Juicy chunks of apple, coated in batter and shallow fried, these homemade apple fritters are a tender, delicious apple breakfast treat that are also incredibly simple to make. They’re topped off with an addictive but simple icing which takes them to a whole ‘nother level.
This apple fritters recipe is the perfect addition to a long line up of amazing apple recipes here. From this Apple Dump Cake to this gorgeous Apple Danish to a Perfect Apple Pie, we’ve got your apple cravings covered.

Homemade Apple Fritters
These apple fritters have become a favorite in our house. Soft, tender dough wrapped around chunks of juicy apple, laced with cinnamon and topped with a simple powdered sugar glaze – these are what Fall breakfast dreams are made of.
Ingredients in Apple Fritters:
Essentially a type of donut but way easier to make, these apple fritters have no yeast. Just a few simple ingredients, and loaded with chunks of apple, there is no rising time to worry about and shallow frying is much simpler than deep frying.
- Flour, baking powder, salt – all regulars in a good batter. The baking powder gives a bit of lift and helps to make them soft.
- Brown sugar – I like brown sugar in my apple fritters. It’s caramel edge is perfect with apples.
- Cinnamon and vanilla – both of these flavours, combined with apples are just meant to be plus it adds Fall to this yummy treat.
- Eggs and milk – both are used for richness and the eggs help bind everything together.
- Apples – the most important ingredient. Granny smiths are my go to. They’re slightly tart, so perfect with the sweetness of the glaze and the richness, and they hold their shape well wherever you use them. Other apples work well too though since these aren’t cooked for long enough for them to turn mushy. Try Gala or Honey Crisp.
How to Make Easy Apple Fritters:
A very simple batter, loaded with apple pieces and then shallow fried and glazed – apple fritters couldn’t be easier.
- Dry ingredients: mix together all the dry ingredients, whisking them together so they’re fully incorporated.
- Add wet ingredients: Whisk together eggs and vanilla then add the flour mixture through. Carefully mix in milk.
- Add apples: Finally add apples to the mix, folding just until combined – try not to overmix it.
- Fry the fritters: You just want to heat about ¼ inch of oil in a medium to large skillet to about 350F then fry the fritters for a few minutes each side.
- Glaze the fritters: Mix up a simple 2 ingredient glaze then dip the top of each fritter in or use a spoon to drizzle the glaze over the top.

Tips And Variations For The Best Apple Fritters:
- Apples: I love Granny Smiths but use your favourite apple. They don’t cook for long enough for the apples to really break down so most will work fine.
- Other fruits: You can try other fruits too – how about peaches (no need to peel) or pears for something different but equally delicious.
- Don’t be tempted to cook them quicker: To high a heat the fritters will burn before they are cooked through. This might mean the batter is still runny inside or the apples are still too firm.
- Don’t overcrowd the pan: Make sure there’s a good amount of room between the fritters. Too many and the oil will cool down too much which will result in greasy or soggy fritters.

Can I Make Apple Fritters Ahead Of Time:
Apple fritters are definitely best served fresh. If you have some leftovers and want to reheat them, I recommend reheating them in the oven at 350 Fahrenheit for 10-15 minutes.

More Amazing Apple Recipes:
- Warm Apple Crostata (with Quick Caramel Sauce)
- Apple Cinnamon Pancakes
- Best Ever Dutch Apple Pie
- Old Fashioned Apple Cobbler
- Caramel Apple Cinnamon Rolls
Homemade Apple Fritters
Ingredients
- 1 cup vegetable oil
- 1 1/4 cups all purpose flour (5.8oz / 165g)
- 2 teaspoons baking powder
- 3/4 teaspoon ground cinnamon
- 1/2 teaspoon salt
- 2 tablespoons brown sugar
- 2 large eggs
- 1 teaspoon vanilla extract
- 1/3 cup milk (80ml)
- 3 medium Granny Smith apples, peeled, cored and cut into small cubes
- 1 1/2 cups powdered sugar (6.8oz / 195g)
- 2-3 tablespoons water
Instructions
-
In a large bowl, sift together the flour, baking powder and cinnamon. Add the salt and sugar and whisk it all together.
-
In a separate bowl, whisk together the eggs and vanilla until frothy.
-
Fold the flour mixture into the eggs, followed by the milk.
-
Add the apples and fold through to combine. Careful not to over mix.
-
Cover a baking tray with paper towel and place a wire rack on top.
-
In a medium skillet, pour in enough oil to be 1/4 inch deep. Heat it over medium heat - it is hot enough when you dip the end of a wooden spoon in and it starts to bubble after a couple of seconds.
-
Place 1/4 cup of batter into the hot oil, 3-4 at a time (don’t overcrowd the pan). Cook for 3-4 minutes until dark golden, then turn and cook on the other side a further 3-4 minutes.
-
Transfer to the wire rack and let them cool a few minutes while you make the glaze.
-
To make the glaze, soft the powdered sugar into a small bowl, then add the water a little at a time until you have a runny glaze.
-
Dip the tops of the fritters into the glaze, then turn glaze side up back on the wire rack for another couple of minutes.
Notes
- Don’t be tempted to cook them quicker or the outside may burn before the inside is cooked through. If this is happening, turn the heat down and let the temperature drop a little before adding more batter.
- Apple fritters are best eaten fresh but if necessary can be reheated in the oven - 350F for 10-15 minutes.
Nutrition
from The Recipe Critic https://ift.tt/31yMJ8Q
https://ift.tt/3lpIUKH