मंगलवार, 25 अगस्त 2020

Angel Food Cake

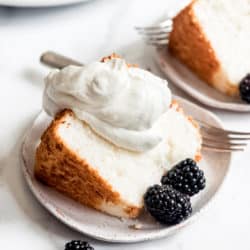
This light & fluffy Angel Food Cake is like a slice of heaven on a plate! It’s delicious all on its own, but absolutely divine topped with sweetened whipped cream and fresh berries or lemon curd!

Angel Food Cake is a classic recipe that is so much more wonderful when it is homemade than just picking up one from the grocery store bakery. The airy sponge crumb is stunningly white and surprisingly easy to pull off for any home baker! For more of our favorite cake recipes, be sure to try this Red Velvet Cake, Pineapple Upside Down Cake, and Carrot Cake.

A slice of angel food cake with whipped cream and blackberries.

Angel Food Cake Recipe

This timeless cake is something of an anomaly among its richer, buttercream covered counterparts. There’s no butter, oil, or even egg yolks in the batter and yet it still manages to remain moist and fluffy thanks to plenty of egg whites that are whipped into soft peaks to provide essential lift before adding flour to the batter. You don’t even grease the pan before adding the batter, which is actually detrimental to the height of your angel food cake, which needs a clean pan so it can cling to the sides and climb while it bakes.

Slices of angel food cake with whipped cream and fruit make a wonderful spring or summer dessert. Or slice it up into chunks to throw into a trifle dish with whipped cream, pudding, and fruit for another fun presentation.

Homemade angel food cake is easier to make than you might think! I’ll share all my tips for achieving a billowy, cloud-like angel food cake on your first try!

An angel food cake on a plate with blackberries.

Angel Food Cake Ingredients:

The ingredient list for this cake is surprisingly short. For the best results, make sure all of the ingredients have come to room temperature before making the cake.

  • Flour: Use cake flour for the best results. It will make for a much lighter taste and fluffier texture than regular all-purpose flour.
  • Granulated sugar: This is an essential part of this cake. It gets divided and added at two separate times. First when it is sifted with the flour and again when beating it into the egg whites.
  • Salt: Just a bit will help bring out the flavor.
  • Egg whites: There is no mistake that there are no leavening agents like baking soda or baking powder in this recipe because the egg whites provide all the lift required for the cake to climb to lofty heights.
  • Cream of tartar: This ingredient is important for helping to stabilize the egg whites while they are being beaten. The cake will collapse without it, and I haven’t found a substitute that I like nearly as well.
  • Vanilla and almond extracts: These two work together to provide a simple, sweet flavor that is just right without being overpowering.

Slices of angel food cake on dessert plates with blackberries and forks next to the rest of the cake on a pink plate.

How to Make Angel Food Cake from Scratch:

  1. Separate egg whites from yolks: It’s easiest to separate egg whites from egg yolks when they are cold, but then you will want to make sure they have a chance to come to room temperature for the best volume as you beat them. You can use the yolks to make homemade ice cream, lemon curd, pudding, or other custard-based recipes.
  2. Sift the flour, part of the sugar, and the salt together: Because you are going to be folding the dry ingredients into beaten egg whites, you really need to sift the flour, part of the sugar, and salt together first both to get even distribution and also to lighten them so they mix in more easily.
  3. Beat the egg whites: Add the cream of tartar to the egg whites and start whisking with an electric mixer fitted with the whisk attachment. After about 1 minute on medium speed, the egg whites will start looking frothy.
  4. Gradually add remaining sugar: Turn the mixer up to medium-high and slowly add the sugar, about 1 tablespoon at a time. Keep mixing until all the sugar has been added and nice white soft peaks have started to form. It usually takes around 3-5 minutes of beating to reach soft peaks, which will hold a shape but flop over when you lift the beaters out of the bowl. Mix in the vanilla and almond extract right at the end.
  5. Fold in 1/3 of the sifted flour mixture a time: Use a rubber spatula to scrape the batter from the bottom of the bowl and lift it over the flour mixture on top, repeating this motion while turning the bowl a quarter turn to fold the dry ingredients in. Once you are left with just a few streaks of flour, go ahead and add the next batch. Usually 10-15 strokes is enough to incorporate the flour into the egg whites.
  6. Spread into a clean, ungreased tube pan: If you sprayed your pan with baking spray out of habit, take the time to wash it out before adding the angel food cake batter. It really does need a clean pan so the batter can cling to the sides while it bakes.

Lets Bake a Cake!

  1. Bake at 375 degrees F: Remember not to peek by opening the oven door to see the cake’s progress!
  2. Leave the cake in the pan, turned upside down, to cool completely: The structure of this cake doesn’t set completely until it is completely cool. Turn the cake pan upside down over a wire rack and let it cool for 1-2 hours before running a sharp knife around the inside rim of the pan, then tap the cake pan on the counter a few times to help release the angel food cake.
  3. Slice & serve: A serrated knife works best for cutting through angel food cake.

Folding sifted flour and sugar into egg whites that have been whipped into soft peaks.

Why Do You Turn Angel Food Cake Upside Down?

If you let your angel food cake cool in the pan without turning the pan upside down first, the weight of the cake is likely to result in it collapsing in on itself. By turning the cake pan upside down and cooling the angel food cake over a wire rack, air can circulate underneath the cake to cool it while the cake itself clings to the inside of the pan. The unique structure of this recipe will cause it to set completely as it cools upside down. Then a quick turn of a sharp knife around the edges of the pan to loosen it and a few taps will let the cake drop right out and maintain its form.

A tube pan turned upside down over a wire rack.

Can I Make Angel Food Cake In A Bundt Pan?

No, a bundt pan will not work for angel food cake because you will have an almost impossible time getting the cake to come out in one pieces. Angel food cake requires smooth sides that only a tube pan can provide. Tube pans are great to have, but you can hack a tube pan if you aren’t ready to make the investment.

An angel food cake on a pink plate with blackberries on top and forks next to it.

More Favorite Cake Recipes

  • Classic Hummingbird Cake
  • One Bowl Chocolate Cake
  • Banana Cake with Cream Cheese Frosting
  • Cream Cheese Pound Cake
  • Marble Bundt Cake
    Print

    Angel Food Cake

    This light & fluffy Angel Food Cake is like a slice of heaven on a plate! It's delicious all on its own, but absolutely divine topped with sweetened whipped cream and fresh berries or lemon curd!
    Course Dessert
    Cuisine American
    Keyword angel food cake
    Prep Time 20 minutes
    Cook Time 30 minutes
    Cooling Time 2 hours
    Total Time 2 hours 50 minutes
    Servings 12 servings
    Calories 165kcal
    Author Amy Nash

    Ingredients

    • 1 cup and 2 tablespoons cake flour
    • 1 2/3 cup granulated sugar, divided
    • 1/4 teaspoon salt
    • 12 large egg whites
    • 1 1/4 teaspoons cream of tartar
    • 2 teaspoons vanilla extract
    • 1/4 teaspoon almond extract

    Instructions

    • Preheat oven to 375 degrees F.
    • Sift the flour, salt, and 2/3 cup of sugar twice. Set aside.
    • Beat egg whites and cream of tartar on medium speed for 1 minute until foamy in the large bowl of an electric mixer fitted with a whisk attachment. Increase the speed to medium-high and gradually add remaining 1 cup of sugar, a tablespoon at a time, over the course of 1 minute. Continue to beat the egg whites until soft peaks form, usually another 3-5 minutes. Mix in the vanilla and almond extract during the last few seconds of beating.
    • Fold in the sifted flour and sugar mixture, about 1/3 at a time, using a rubber spatula to scrape the bottom of the bowl and 10-15 strokes each time. Turn the bowl frequently while mixing until just a few streaks of flour remain. Use 10-20 extra folding strokes after the last addition to make sure everything is evenly combined and no streaks of flour remain, but take care not to deflate the egg whites too much with vigorous stirring.
    • Spread the angel food cake batter into an ungreased 9- or 10-inch tube pan. Run a knife through the batter to remove air bubbles.
    • Bake for 35 to 40 minutes for 9-inch or 30 to 35 minutes for 10-inch cake, until cake springs back when lightly pressed on top.
    • Cool in the pan by turning the hot cake pan upside down over a wire rack. Let the cake cool completely in the pan, then loosen from the sides and center tube by running a sharp knife around the edges. You may need to tap the pan on the counter a few times for the cake to release.
    • Slice with a serrated knife and serve with whipped cream and fresh fruit.

    Nutrition

    Calories: 165kcal | Carbohydrates: 36g | Protein: 5g | Fat: 1g | Saturated Fat: 1g | Sodium: 104mg | Potassium: 116mg | Fiber: 1g | Sugar: 28g | Calcium: 4mg | Iron: 1mg


from The Recipe Critic https://ift.tt/34vycwd
https://ift.tt/3hqYZgU

सोमवार, 24 अगस्त 2020

Garlic Ranch Chicken Skewers

We’re excited to partner with Reynolds Wrap® for this sponsored recipe

Garlic Ranch Chicken Skewers are the perfect way to enjoy kabobs this summer. Get grilling with this easy to make chicken that has all the flavor on each skewer!

Reynolds Wrap® Non-Stick Foil makes clean up much easier and is great for sticky food because it won’t get stuck on the pan. Grilled Citrus Salmon with Pineapple Salsa, Easy Mini Burritos or Grilled Pizza are even more great recipes to try with Reynolds Wrap®.

Chicken skewers laying on Reynolds wrap with bell peppers and onions in separate glass bowls.

Grilled Garlic Ranch Chicken Skewers

Start your evening off with a delicious and simple dinner. I love making skewers on the grill in the summer time. It is quick and easy to assemble and add right onto the grill. The chicken has a nice garlic ranch flavoring and becomes tender and juicy once cooked. Add vegetables on the skewers to add flavor and a soft, crunchy texture that completes the meal. The chicken and vegetables make the perfect combination!

With the help of Reynolds Wrap® Non-Stick Foil, the skewers are assembled and laid flat on the Reynolds Wrap® non stick foil. To help keep the grill clean and free from the chicken sticking or the vegetables falling through the grates. Reynolds Wrap® Non-Stick Foil will cook the chicken skewers perfectly, giving it a steamy covering while grilling it from the inside out, without any of the chicken and vegetables getting stuck to the foil. These garlic ranch chicken skewers are so tender and flavorful your family is going to be begging for more.

Garlic Ranch Chicken Ingredients:

Easy ingredients that are always on hand. Cut the chicken into the same size for the best cooking. Slice the vegetables to a similar size and add them in-between the chicken. Together the garlic ranch flavor and Reynolds Wrap® Non-Stick Foil will create the perfect dinner!

  • Dry Ranch Dressing Mix: Simple way of adding the most flavor to your chicken.
  • Olive Oil: Mix well with the dressing to create a baste that can be brushed over the chicken and vegetables.
  • Apple Cider Vinegar: Gives a sweet and spicy taste to the ingredients.
  • Garlic: Adds some intense flavoring over the chicken skewers.
  • Chicken: Cut into 1 inch chunks of pieces.
  • Bell Peppers, Red Onion and Zucchini: Chop evenly and flat to be able to slide onto the skewers evenly.
  • Reynolds Wrap® Non-Stick Foil: Create a grill packet using foil to help cook, grill and steam the chicken and vegetable skewers.
  • Wooden Skewers: Great for holding onto the chicken and vegetables while cooking.

Let’s Grill Some Chicken Skewers!

A trick using the Reynolds Wrap® non stick foil is to make a grill shield by folding a sheet of foil in thirds like a business letter. Slip it under the exposed parts of bamboo skewers when grilling kebabs to help keep them from burning.

  1. Whisk Together Ingredients: Preheat grill to medium-high heat.  In a large bowl whisk together the dry ranch mix, olive oil, apple cider vinegar and garlic.  Add in the chicken, red bell pepper, yellow bell pepper, red onion and zucchini and toss to coat.
  2. Prepare Skewers: Lay down a sheet of foil with the dull side up.  Thread the chicken and vegetables onto the wooden skewers.  Lay evenly across the foil.  Fold up the edges and tightly close around the skewers.
  3. Grill the Chicken Skewers: Place the foil pack on the fire or grill.  Let the kaboobs grill on each side about 5-7 minutes, or until chicken is cooked throughout and no longer pink.

Two photos next to each other. One with the garlic ranch seasoning mix and the other photo with the chicken and vegetables being stirred together with the mix.

How Long Do You Soak Bamboo Skewers?

It is best to soak bamboo or wooden skewers for about 30 minutes long. You can even soak them overnight in water. Well, soaked skewers will last longer on the grill without burning up the ends of the sticks.

Four photos being used in the process of making chicken skewers with Reynolds wrap foil packet.

Chicken skewers wrapped in foil.

What Temperature Do You Grill Skewers At?

Chicken is grills quickly! Place the chicken skewer foil packet on the grill directly. Prepare the grill for direct heat grilling over medium to medium-high heat. This ranges from 350 to 450 degrees Fahrenheit depending on the grill. Allow the grill to preheat for about 10 to 15 minutes. Use a meat thermometer to determine if your chicken is cooked through properly before taking it off the skewers.

Chicken and vegetables on a white plate with Reynolds wrap box on the side.

More MUST Try Skewer Recipes:

Print

Garlic Ranch Chicken Skewers

Garlic Ranch Chicken Skewers are the perfect way to enjoy kabobs this summertime. Get grilling with this easy to make chicken that has all the flavor on each skewer!
Course Dinner, Main Course
Cuisine American
Keyword chicken skewers
Prep Time 15 minutes
Cook Time 15 minutes
Total Time 30 minutes
Servings 4 People
Calories 403kcal
Author Alyssa Rivers

Ingredients

  • 1 package dry ranch dressing mix
  • 1/2 cup olive oil
  • 1/4 cup apple cider vinegar
  • 3 cloves garlic minced
  • 1 pound of chicken cut into 1 inch squares
  • 1 red bell pepper cut into 1 inch squares
  • 1 yellow bell pepper cut into 1 inch squares
  • 1 red onion cut into 1 inch squares
  • 1 zucchini sliced
  • Reynolds Wrap® Non-Stick Foil
  • 4-5 wooden skewers

Instructions

  • Preheat grill to medium high heat. In a large bowl whisk together the dry ranch mix, olive oil, apple cider vinegar and garlic. Add in the chicken, red bell pepper, yellow bell pepper, red onion and zucchini and toss to coat.
  • Lay down a sheet of Reynolds Wrap® Non-Stick Foil with the dull side up. Thread the chicken and vegetables onto the wooden skewers. Lay evenly across the foil. Fold up the edges and tightly close around the skewers.
  • Place the foil pack on the fire or grill. Let grill on each side about 5-7 minutes, or until chicken is cooked throughout and no longer pink.

Nutrition

Calories: 403kcal | Carbohydrates: 21g | Protein: 4g | Fat: 34g | Saturated Fat: 6g | Cholesterol: 9mg | Sodium: 1330mg | Potassium: 369mg | Fiber: 2g | Sugar: 4g | Vitamin A: 1295IU | Vitamin C: 104mg | Calcium: 37mg | Iron: 2mg


from The Recipe Critic https://ift.tt/34rQM8B
https://ift.tt/2EyulUw

रविवार, 23 अगस्त 2020

Slow Cooker Brown Sugar Balsamic Glazed Pork

This juicy, melt in your mouth brown sugar balsamic glazed pork is an explosion of flavor. With simple ingredients, easy prep and taste that wows, this dish will make you the hit of the dinner table. You will dream about this pork after you make it.  It’s just that good!

Making quick slow cooker sandwiches are a MUST in the summer! If you love sandwiches as much as we do try these favorites: Slow Cooker French Dip Sandwiches and Slow Cooker Chicken Caesar Sandwiches.

Brown sugar balsamic glazed pork in a bun.

Brown Sugar Balsamic Glazed Pork

This is one of those recipes that you have to try. You throw it into the crockpot and let it work its magic. By the time it was finished and I pulled it out it was falling apart because it was so tender. But you are going to LOVE this glaze. It will still be fantastic.

The combination of brown sugar and balsamic vinegar are a match made in saucy heaven. We poured some of the sauce over the meat before making the sandwiches to make them extra juicy. This sauce would be sublime served as a gravy over rice or potatoes as well. Cooking the meat on low ensures a nice tender meat. If your crockpot cooks hot, add extra water or broth to avoid burning.

Brown Sugar Glazed Pork Ingredients:

Slow cooker pork is so simple to make and comes together quickly. Tender pork for a sweet and savory dinner! Place everything in the slow cooker and let it work its magic!

  • Pork Tenderloin: You can also substitute pork shoulder or pork butt for these sandwiches
  • Salt: Don’t skimp here, it helps to bring out flavor and tenderize the meat.
  • Coarse Pepper: If you don’t have coarse regular pepper will work here too.
  • Minced Garlic: For faster prep use jarred minced garlic.
  • Brown Sugar: Try dark brown sugar for an extra zing of flavor
  • Cornstarch: This will thicken the sauce for you.
  • Balsamic Vinegar: This can usually be found in your local grocery store next to apple cider vinegar.
  • Soy Sauce: You can use low sodium soy sauce here if you want.
  • Water: You’ll use half a cup in the crockpot with the pork and half a cup in the sauce.

How to Make Glazed Pork:

First sear the pork to create a crispy outside with a tender inside. Create a sauce that is irroestiable then place it all together in a slow cooker.

  1. Sear Roast:  Rubbing in the salt and pepper ensures flavor and tenderizing. Rub the salt and pepper over the pork tenderloin. If you are pan searing it, heat 2 T olive oil in a skillet over medium high heat. Let each side get very dark brown about 1-2 minutes. 
  2. Add ingredients to Slow Cooker : Add 1/2 cup of water to the crockpot and place the pork inside.Cook the pork on low for 6-8 hours.
  3. Make Sauce:The last hour of cooking, in medium saucepan mix together garlic, 1/2 cup water, brown sugar, cornstarch, balsamic vinegar, and soy sauce together. Bring to a boil and reduce the heat to medium low and stir until the glaze thickens. Slowly add more cornstarch if needed.
  4. Glaze in Oven: Brush the roast with the glaze 2-3 times the last hour of cooking. To get the caramelized crust, remove the pork roast from the crockpot and place on an aluminum foil lined pan. Brush more of the glaze on top and broil on high for 2-3 minutes until the desired crust is achieved.
  5. Shred: With two forks shred the pork. Serve with remaining glaze on the side.

The process of cooking pork and slow cooking it.

Tips and Variations for this Slow Cooker Dish:

These simple tips and variations will help guide you to making the best pork for dinner!

  • Meat: This can be made using chicken breasts or boneless skinless chicken thighs even use a beef chuck roast.
  • Cook Longer: Let the sauce cook with the roast for 15 min up to 30 min for added richness.
  • Shredding Meat: Shred the meat on a cookie sheet covered with aluminum foil, poor sauce over the top and broil for a caramelized dark crust along the top
  • Broth: Use beef broth or vegetable broth instead of water to cook the roast in.
  • Try it with an Instant Pot: This can also be done in an instant pot, add an extra half a cup of water or cook it in the sauce. Set the Instant Pot to high pressure for 45 minutes. Keep in mind you need to allow extra time for it to come to pressure and to naturally release for 15 minutes.

Shredded pork in a slow cooker being stirred with a wooden spoon.

Storing Slow Cooker Pork:

This pork is so easy to make and perfect for making a large crowd. Make this ahead of time and easily warm it up when ready to serve!

  • Make Ahead: This is so easy to make ahead of time and warms up perfectly. Store in the refrigerator for 4 to 5 days in an airtight container.
  • Freezing Pork: Let the meat cool, then place in an airtight container or ziplock bag. Let out access air and lay flat in the freezer. When ready to serve, place in the refrigerator over night.
  • Warming Up: Place in the slow cooker, reheat in the microwave or cook it in the oven until warmed through.

Pork sandwich sitting on a white plate.

More Amazing Crockpot Recipes to Try:

  • Pork Carnitas 
  • Skinny Pulled Pork Barbacoa
  • Beef Carnitas Tacos
  • Asian Pulled Pork
  • Cafe Rio {Copycat} Sweet Pulled Pork
Print

Slow Cooker Brown Sugar Balsamic Glazed Pork

This juicy, melt in your mouth brown sugar balsamic glazed pork is an explosion of flavor. With simple ingredients, easy prep and taste that wows, this dish will make you the hit of the dinner table. You will dream about this pork after you make it.  It's just that good!
Course Dinner, Main Course
Cuisine American
Keyword slow cooker glazed pork
Prep Time 20 minutes
Cook Time 6 hours
Total Time 6 hours 20 minutes
Servings 6 Servings
Calories 353kcal
Author Alyssa Rivers

Ingredients

  • 2-3 pounds Pork tenderloin
  • 1 teaspoon salt
  • 1/2 teaspoon coarse pepper
  • 1 teaspoon minced garlic
  • 1/2 cup Water
  • 1 cup Brown sugar
  • 1-2 tablespoon Cornstarch
  • 1/2 cup Balsamic Vinegar
  • 1/2 cup Water
  • 4 tablespoons Soy sauce

Instructions

  • Rub the salt and pepper over the pork tenderloin. If you are pan searing it, heat 2 Tablespoons olive oil in a skillet over medium high heat. Let each side get very dark brown about 1-2 minutes. Add 1/2 cup of water to the crockpot and place the pork inside.
  • Cook the pork on low for 6-8 hours. The last hour of cooking, in medium saucepan mix together garlic, 1/2 cup water, brown sugar, cornstarch, balsamic vinegar, and soy sauce together. Bring to a boil and reduce the heat to medium low and stir until the glaze thickens. Slowly add more cornstarch if needed.
  • Brush the roast with the glaze 2-3 times the last hour of cooking. To get the caramelized crust, remove the pork roast from the crockpot and place on an aluminum foil lined pan. Brush more of the glaze on top and broil on high for 2-3 minutes until the desired crust is achieved.
  • With two forks shred the pork. You can serve with rice, potatoes, or in sandwiches. Serve with remaining glaze on the side.

Notes

Updated on August 23, 2020
Originally Posted on October 10, 2013

Nutrition

Calories: 353kcal | Carbohydrates: 42g | Protein: 33g | Fat: 5g | Saturated Fat: 2g | Cholesterol: 98mg | Sodium: 1154mg | Potassium: 692mg | Fiber: 1g | Sugar: 39g | Vitamin C: 1mg | Calcium: 48mg | Iron: 2mg


from The Recipe Critic https://ift.tt/3gjKRVn
https://ift.tt/3j86wlm

शनिवार, 22 अगस्त 2020

Crispy Potato Skins

Baked Potato Skins have a crispy outer shell that is loaded with a cheddar cheese, bacon and green onion combination. These potatoes are everyones favorite appetizer or side dish!

Bring on the appetizers with these delicious skins and watch them disappear quickly! For more classic appetizers try this Crispy Onion Rings, Spinach Artichoke Dip or Mouthwatering Cowboy Caviar.

Potato skins on a white plate with ranch dipping sauce on the side.

Crispy Potato Skins

These homemade potato skins are so simple to make and come together so quickly for your next dinner or party. Make the perfect side dish with all the flavor and watch them disappear quicker than you made them. Potato skins are a MUST make!

Serve these skins as a fun game night appetizer or enjoy them with as a side with your favorite meat. The crispy outside gives a nice shell that is easily hand held for dipping or tender enough to cut through with a fork. This appetizer is one of the best and so delicious!

Homemade Potato Skins Ingredients:

Russet potatoes are known to be thicker and hold together the best for these potatoes. They are a stronger potato to cut and hollow out. Stuff your potato with all the goods and bake until perfection!

  • Potatoes: Russet potatoes are the best because there larger and 
  • Olive Oil: This coats the skins of the potatoes and creates a crispy outside.
  • Salt and Pepper: To Taste!
  • Cheddar Cheese: Sprinkle over top of the baked potato.
  • Bacon: Cook and crumble pieces.
  • Green Onions: Chop and add to the top.
  • Ranch or Sour Cream: Great for dipping or loading the potato skins.

How to Make a Classic Appetizer:

This appetizer or side dish is one of the best and easiest recipes to make for a quick dish to serve. Cut and carefully hallow out each potato skin. This recipe is great even for doubling!

  1. Prepare Potatoes: Wash and scrub the potatoes. Preheat oven to 400 degrees.  Prick with a fork and bake for an hour or until tender.  Or cook in the microwave for 5 minutes each potato.  Let the potatoes cool to the touch.
  2. Bake: Cut the potatoes in half.  Scoop out the potatoes leaving about 1/4 inch along the sides.  Place the potatoes on a baking sheet skin side up and brush with olive oil.  Salt and pepper.  Bake for about 10 minutes.  Flip to the other side and bake an additional 10 minutes or until they start looking golden brown.
  3. Remove and Garnish: Remove from the oven and add the cheese.  Add back to the oven for 2-3 minutes until the cheese has melted.  Top with bacon, green onions and favorite toppings. 

The process of making potato skins.

Toppings for Baked Potato Skins:

Load your potato skins up with all your favorite toppings! Keep it simple with cheese and bacon or go all out with some of these choices.

  • Classic: Bacon, cheese and onions are always the favorite.
  • Taco Style: Ground beef with taco seasoning, cheese and garnished with cilantro.
  • Southern: Pulled pork with barbecue sauce.
  • Kid Approved: Sloppy Joe meat, cheese and chopped bun to top it off with.
  • Spicy Skins: Jalapeño poppers are a hot appetizer that makes a fun twist.

Tips for Making the Best Potato Skins:

Here are some quick and easy ways to make homemade crispy potato skins easier for you to make. These will turn out to be the best appetizer you make!

  • Size of Potatoes: It is best to choose large potatoes and russets if possible. These will be the strongest and hold up best when baked.
  • Cool: Let the potatoes cool completely before cutting into them. They will fall apart if they are cut too soon.
  • Cutting: Cut lengthwise on the potato skin. Carefully spoon out the inside of the potato. Leave about 1/4 inch of the potato to help for stability.
  • More recipes! Keep the hollowed potato parts for more recipes like this garlic ranch smashed potatoes or making mashed potatoes.

A potato skin being dipped in ranch sauce.

More Delicious Appetizers:

Print

Crispy Potato Skins

Baked Potato Skins have a crispy outer shell that is loaded with a cheddar cheese, bacon and green onion combination. These potatoes are everyones favorite appetizer or side dish! 
Course Appetizer, Side Dish
Cuisine American
Keyword crispy potato skins, loaded potato skins, potato skins
Prep Time 10 minutes
Cook Time 25 minutes
Total Time 35 minutes
Servings 8 Potato Skins
Calories 298kcal
Author Alyssa Rivers

Ingredients

  • 4 small Russet Potatoes
  • 2 Tablespoons olive oil
  • salt and pepper
  • 2 cups cheddar cheese shredded
  • 6 slices bacon chopped and cooked
  • green onions sliced
  • Ranch or sour cream for serving optional

Instructions

  • Wash and scrub the potatoes. Preheat oven to 400 degrees. Prick with a fork and bake for an hour or until tender. Or cook in the microwave for 5 minutes each potato. Let the potatoes cool to the touch.
  • Cut the potatoes in half. Scoop out the potatoes leaving about 1/4 inch along the sides. Place the potatoes on a baking sheet skin side up and brush with olive oil. Salt and pepper. Bake for about 10 minutes. Flip to the other side and bake an additional 10 minutes or until they start looking golden brown.
  • Remove from the oven and add the cheese. Add back to the oven for 2-3 minutes until the cheese has melted. Top with bacon, green onions and favorite toppings.

Nutrition

Calories: 298kcal | Carbohydrates: 20g | Protein: 11g | Fat: 19g | Saturated Fat: 9g | Cholesterol: 41mg | Sodium: 290mg | Potassium: 504mg | Fiber: 1g | Sugar: 1g | Vitamin A: 283IU | Vitamin C: 6mg | Calcium: 218mg | Iron: 1mg


from The Recipe Critic https://ift.tt/3lgcF0P
https://ift.tt/2Elc1Op